If you’ve never tried to deadlift, you really should. In fact, just take the next 3 minutes to read the 5 points below. They’ll reduce your fear of an exercise that is incredibly beneficial, regardless of your gender or fitness goal. And then you’ll find a guide to performing them flawlessly.
And if you already perform and love the deadlift, you can spend the same 3 minutes reading and learning why the exercise is even better than you thought. Or you can skip on ahead to the deadlift form guide. Your call.
Ready? Let’s set a timer for 3 minutes…
Reason to Deadlift #1: You’re going to get way stronger—and therefore live longer.
The deadlift is a true total body exercise that builds full body strength (both your lower and upper body will benefit). And getting stronger is NEVER a bad thing.
In fact, getting stronger is far better for you than you may think. Researchers have found a correlation between grip strength and mortality, as in those with stronger grips tend to live longer. And one thing you will definitely get from deadlifting is a strong grip.
(Not to mention stronger quadriceps, hamstrings, forearms, traps, and glutes, just to name a few.)
Reason to Deadlift #2: That strength will come in handy throughout your (now longer) life.
There are two types of people in the world: Those who struggle to move a couch, and those who deadlift.
But let’s say you never move couches. At some point or another, you’re going to need to pick something up off of the ground. When you do, you’ll be far better suited to do so because you deadlift.
The deadlift takes a basic human movement (picking something up) and makes you far more capable at it. That means you’ll be far less likely to get hurt.
In fact….
Reason to Deadlift #3: Deadlifts actually protect you from lower back pain.
How many people do you know who complain about back pain?
That’s right, seemingly everybody.
A review of 28 studies found that, from age 30 onward, the percentage of people within an age group who are dealing with chronic low back pain increases with each passing year.
So here you are, avoiding deadlifts to save your back, but yet you still have lower back pain.
Why? Probably because you’ve been avoiding deadlifts in the first place.
Don’t believe us? Consider that studies indicate that properly training the deadlift can outright fix low back pain.
How? By strengthening the spinal erectors, or the muscles that maintain the integrity of the spine. They travel the entire length of your spine, tucking under the lats and traps, and running all the way down to your lower back.
According to research, the deadlift trains this musculature better than anything. Two studies looked at spinal erector activation during the deadlift, and found that the exercise induced high amounts of upper spinal erector activity in a way not seen with other exercises.
The studies also showed strengthening in the lower back.
“But wait,” you say. “I’m not really ‘into’ weight training.”
That’s cool. And completely understandable. But before you say that weights aren’t for you, let’s just make sure you understand a few other things here…
Reason to Deadlift #4: Weight training helps you lose—and keep off—fat.
The stronger you are, the more lean body mass you carry.
The more lean body mass you carry, the higher your basal metabolic rate. That’s the number of calories your body burns on it’s own just to keep you alive—before factoring in things exercise and NEAT.
One study found that men who weight trained burned 350 more calories on average while just sitting around and watching television.
Some claim that it takes years of lifting weights to achieve this effect, but research shows otherwise. One study found that just 16 weeks of strength training produced a noticeable lift in the resting metabolic rate of a group of men aged 50-65.
And while people often think that cardio is king for keeping fat off (total myth, BTW), researchers who ran a cohort that encompassed more than 10,500 men across 12 years found that those who lifted weight gained less fat over the long haul.
Reason to Deadlift #5: Weight training improves other aspects of your health, too.
For example, one study found that muscle mass was inherently protective against diabetes.
Muscle also plays a crucial role if you ever have to recover from surgery or serious illness.
We could go on, but you get the point: Being strong is good. Having muscle is good. And deadlifts will help you build plenty of it.
That was a fun 3 minutes, right? We thought so too. Well, now that you know the value of deadlifts, let’s show you how to do them properly so you never fear them again…
Proper Deadlift Form: How to Fit the Move to Your Body Type
Maybe you’ve tried deadlifting in the past and thought the exercise just didn’t feel right. If so, you’re not alone.
The deadlift involves many muscles, all of your limbs, and every load-bearing joint (ankles, knees, hips and shoulders) in your body. There are a lot of variables at play. So having hard-and-fast rules about deadlift form is nearly impossible.
Your body is your body. That seems like an obvious fact, yet it’s one that’s often overlooked when it comes to form.
For example, two people who are the same height may have totally different torso and femur lengths.
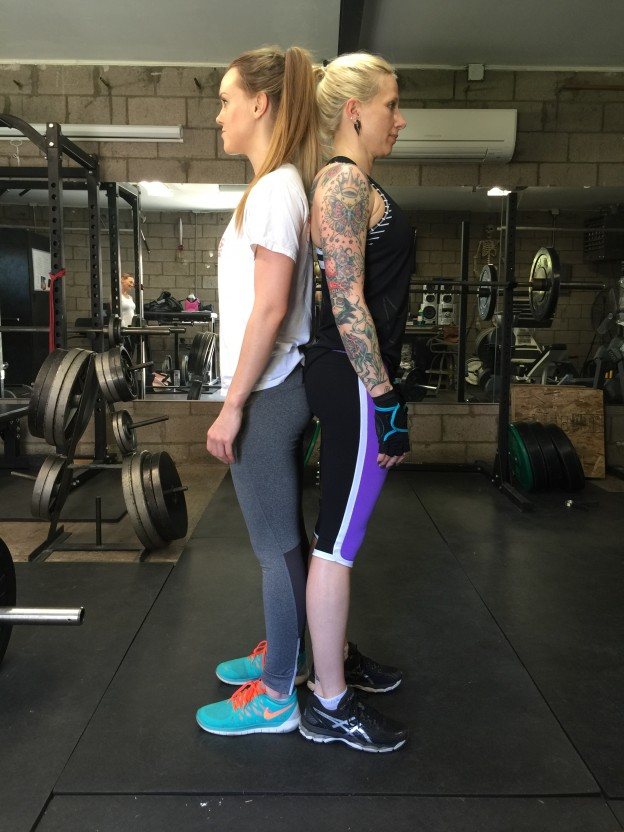
Photo courtesy of bretcontreras.com
Strength coach Bret Contreras does an excellent job of explaining that these different bone structures will result in totally different squat forms. The same is true for the deadlift.
A person who has a short torso and long femurs will have a more hip-dominant pull, meaning that their butt will be higher in the air and most of the force will come from their glutes and hamstrings.
Meanwhile, a person who has a long torso and short femurs would be able to get lower and involve their quads a bit more.
Reading this right now, you’re probably thinking, “How do I know whether I have a short or long torso?”
Glad you asked. There’s actually a relatively simple way to tell.
The technique can also tell you whether you’re better off using a sumo deadlift (very wide stance) rather than a traditional deadlift (where your feet are roughly hip-width apart) stance. (For more discussion about the pros and cons of each, see the section on “Stance” below.)
You’re going to need a measuring tape. Any standard one will do.
Measure the distance from the bony part of your hip to the floor. That’s your leg length.
Then measure from the same point on your hip to the top of your head. That’s your torso length.
Lastly, measure from the top of your shoulder to the tip of your middle finger. That’s your arm length.
Divide each of those numbers by your total height in inches. Then check the numbers against this table:
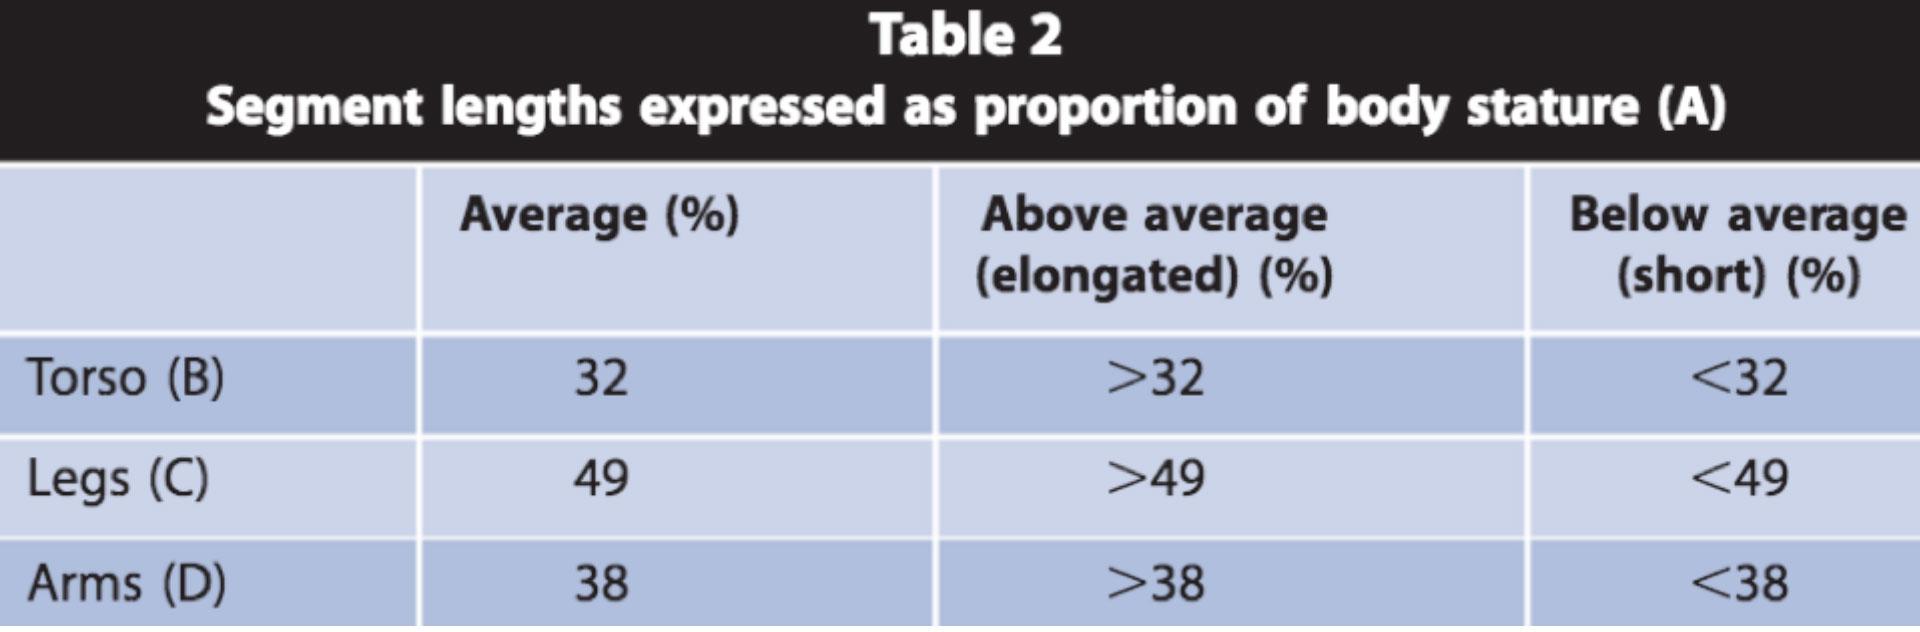
Your percentages will tell you whether you have a short, long or average-length torso. Same for your arms. (We can disregard your legs, since they are essentially the opposite of your torso — i.e. if the torso is long, your legs will be short.).
Those two pieces of information can tell you whether a conventional deadlift or sumo deadlift will likely feel better for you (note: no matter what the chart says, you can always go by “feel”):
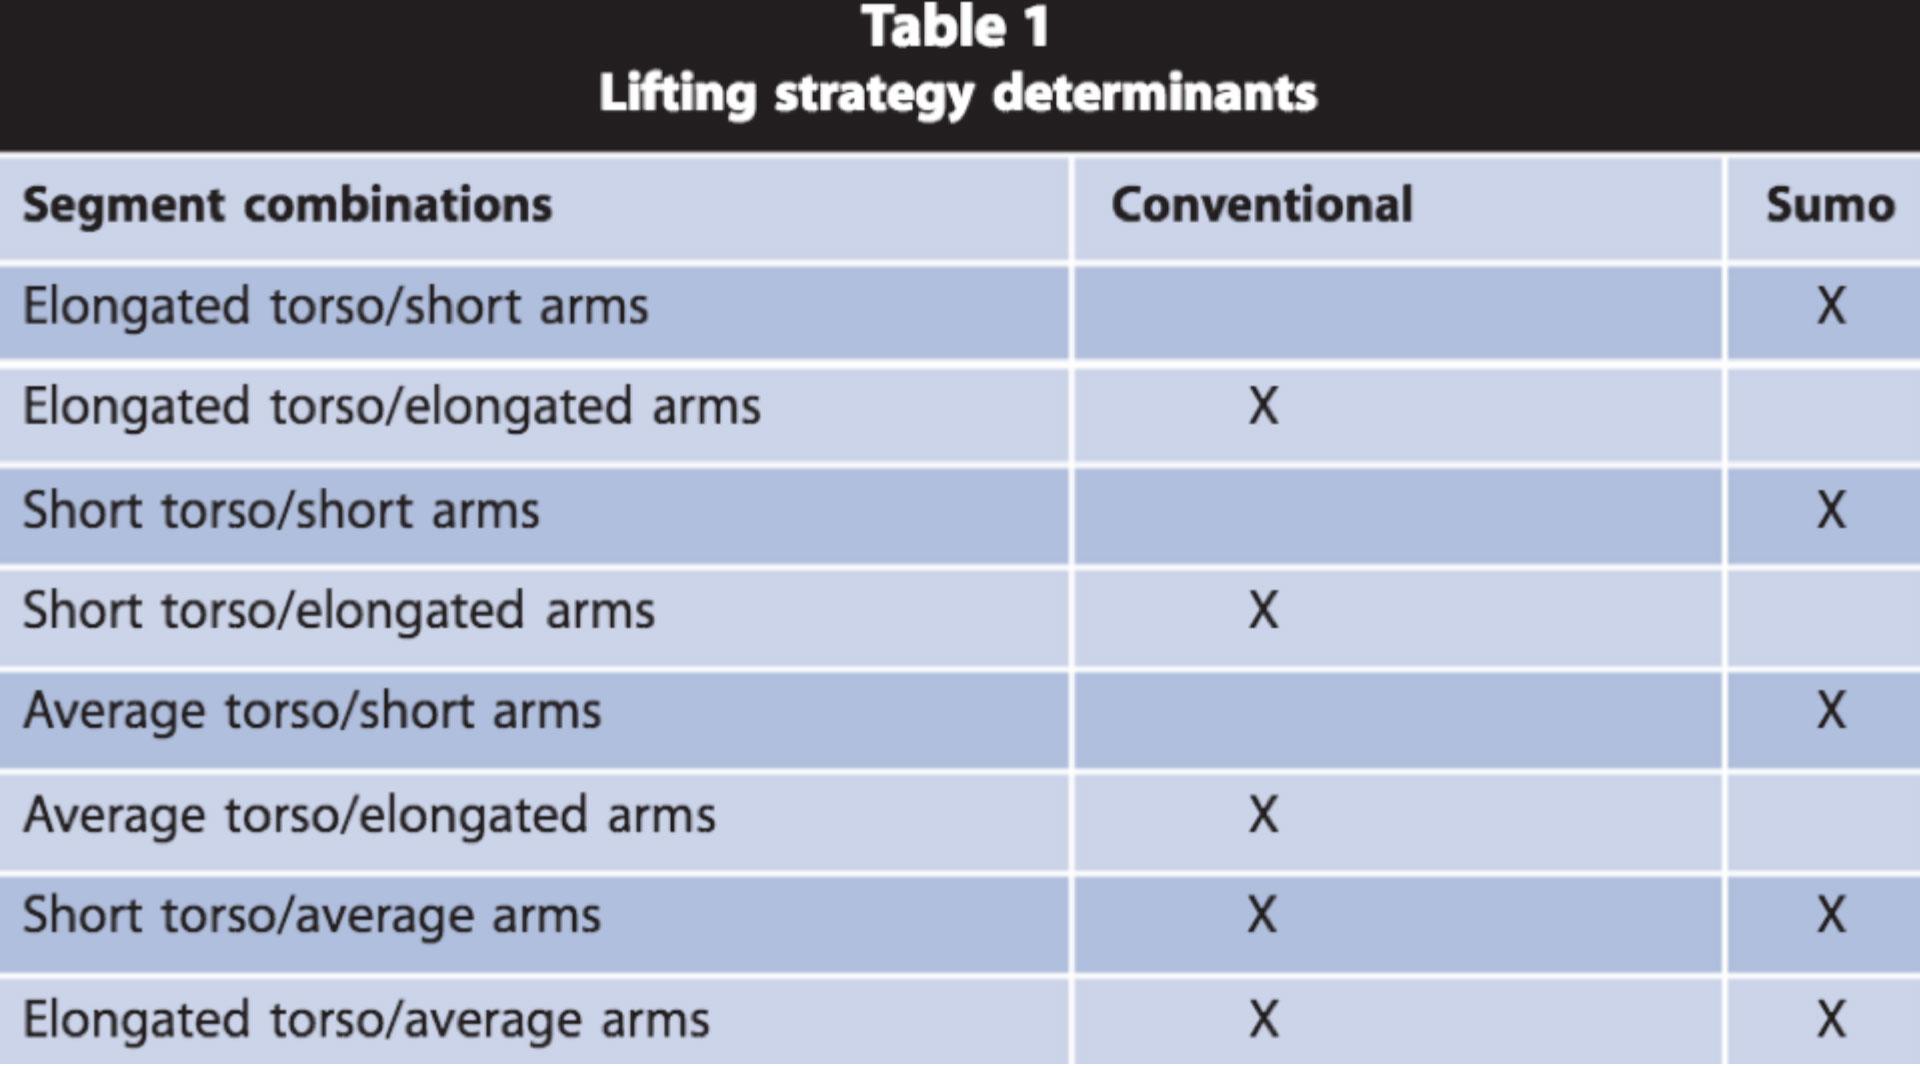
Both of those tables are from Professor Michael Hales’ excellent paper “Improving The Deadlift: Understanding Constraints and Physiological Adaptations to Resistance Exercise.” And he’s the first to state that they are not the be-all, end-all. They are merely lifting recommendations based on your body’s structure.
Other factors like strength and flexibility will also come into play. But this should help you see which approach should feel better based on what your momma gave you.
Keep in mind, this does not mean you have to “only” do conventional-style or sumo-style deadlifts forever. In fact, Hales and nearly everyone else worth their salt will recommend that you switch between the two styles occasionally.
Conventional and sumo work your muscles slightly differently (conventional requires more hip drive, while sumo involves the upper legs a little more), so using both can develop a more well-rounded base of strength.
Deadlift Form: Follow these guidelines before you pull
#1. Your stance
Conventional Deadlift Foot Placement: You can start with your feet shoulder-width apart. If you’re not sure where this is, try this: Jump in the air 2-3 times. Where your feet land naturally is the proper stance for the conventional deadlift. Your toes should point forward or outward slightly.
Sumo Deadlift Foot Placement: You can try out two different starting positions.
- Option #1: Place your feet as wide as possible, meaning your toes are nearly flush against the weight plates. Many successful sumo deadlifters pull from this position. But one obvious drawback here is the risk of dropping the weight onto your toes. So be careful.
- Option #2: Widen your feet as far as you can while still being able to keep your shins vertical when you lower yourself to grip the bar. The wider your stance is, the more your feet should point outward
One last note about where to stand. Set up so that the bar is about an inch to an inch-and-a-half from your shins. When you look down at the bar, it should be positioned right about the middle of your foot, blocking the laces of your shoes from view.
#2. Your grip
Figuring out where to place your hands is quite simple. Just take a shoulder-width grip.
Choosing how to grip the bar is a little more complicated, and may change throughout your workout. There are three main options:
https://www.instagram.com/p/BWeS2EhF-_y/?taken-by=wilfredofitness
- Option #1: The double-overhand grip. This is the “best” grip most of the time. As you increase the amount of weight you can deadlift, you’ll eventually reach a weight where your grip strength becomes an issue. That’s when mixed grip comes in…
- Option #2: The mixed grip. Also known as “one overhand, one underhand” grip, this style allows you to pull heavier weights more easily. “Anybody who has trained the deadlift for a few months has had the experience of pulling on a weight that seemed too heavy even to break off the ground when tried with a double-overhand grip, only to find that it goes up surprisingly easy when the grip is alternated,” writes Mark Rippetoe in Starting Strength: Basic Barbell Training.There are some drawbacks to the mixed grip, however. Research shows that the bicep activity in the supinated (underhand grip) arm is much higher during this lift. Over time, that could create muscle imbalances, so it’s a good idea to switch which arm is overhand from set-to-set or workout-to-workout.
- Option #3: The hook grip. This grip is not very popular and for good reason—it hurts, but it’s not without benefits. The idea behind the hook grip is that you can use more weight than a double-overhand grip, since your thumbs act as hooks for the bar. But here’s the thing: Much of the weight ends up pulling on your thumbs. The stress this places on the tissue, bones, and joints of your thumbs does not feel good. One way people attempt to eliminate the grip problem altogether is to use straps.
Our suggestion would be to train without straps, with a double-overhand grip, for as many sets as possible. When you get heavy, use a mixed grip and vary which hand is over. If, after switching to a mixed grip, you still can’t hold the weight, then use straps to continue deadlifting heavy and train your grip with other exercises (farmer’s carries and suitcase deadlifts are two good options).
What to Do When You’re Ready to Lift the Weight
Ok, you’ve placed your feet and gripped the bar. It’s almost go time. Here are five things to check before you rip that sucker off the floor.
#1: Your Head
Where it goes wrong: You know that whole “look to the sky” cue? Don’t do that. Looking upward extends your neck, which is a great way to give yourself a neck strain.
How to get it right: Keep a level head position and a neutral gaze. Your chin should stay tucked. Think “tall through the back of your head.” Or, just think about creating a “double chin.” Maintain that position by looking straight ahead, rather than up, through the entire lift.
#2: Your Shoulders
Where it goes wrong: There are two potential problems here. First is the “Whoops, I rolled my shoulders forward in order to grab the bar” issue. This sets you up to pull like Quasimodo—and you don’t want to do anything in the gym looking like a hunchback. The other is the “I just wasn’t paying attention to my shoulders at all” issue. This one often winds up going Quasimodo-like as well, especially if you’re using heavy weight.
How to get it right: Pull your shoulders in and hold them tight to your sides. “Squeeze your armpits as if you had oranges in them and were trying to make juice,” is a cue we love from the always-clever Tony Gentilcore that achieves this. By pulling your shoulder blades down and in (think squeezing a pencil between your shoulder blades), you decrease the distance between your shoulders and hips, which will help you move more weight more efficiently. Plus, you’re getting your lats more involved, which will help prevent rounding.
#3: Your Legs
Where it goes wrong: Some people just bend over and grab the bar without putting any tension on the muscles they’re trying to work. While you can get away with this, it won’t put you in a position to pull the most weight, or pull it effectively. There is a better way.
How to get it right: Standing at the bar, hinge at the hips by pushing them backwards (imagine you have to open a door with your butt and you can’t use your hands). You should quickly feel tension running up the back of your legs and into your glutes. That’s a good thing. Once you feel that tension, maintain it while bending the knees just enough so that your hands can reach the bar.
#4: Your Core
Where it goes wrong: Pulling without breathing in first. What’s wrong with that?
Think of a soda can. When it’s full and sealed, it can support a ton of weight no problem. But once it’s opened and all of that pressure is released, the same weight will crumple it with ease.
A big breath in creates intra-abdominal pressure. That pressure will make you more stable, protect your spine, and help you lift far more weight.
How to get it right: Step up to the bar and get into position. Take a big breath in. As you inhale, push the air down and out to fill your abdomen. This is important: you’re not filling your chest with air (think about how you react when you’re out of breath); instead, you want to fill your belly.
Engage your core to hold your breath in that position, then lift. Keep that breath held throughout the rep, from the floor, up to lockout, and back down to the floor. Take a new breath in before every rep.
#5: Your Hands and Arms
Where it goes wrong: Gripping the bar loosely, or just pulling the bar without taking the slack out first.
How to get it right: First, when it comes to grip, grab ahold of that bar like you mean it. Regardless of which type of grip you chose, you should be gripping the bar as hard as you can.
Next, pull the slack out of the bar. What does that mean? When you grip, don’t just try to crush the bar into dust, also pull it apart.
Now, it’s go time.
Executing the Deadlift
You really only need to think about two things when you pull the bar:
- Push off the floor
- Keep everything tight (especially your core and lats)
During a conventional deadlift, if you are thinking about “pushing the floor away,” it will help you generate tension throughout your hips and knees.
If you’re doing a sumo deadlift, it may be helpful to think of this as “spreading the floor,” since that means pushing outwards on the sides of your feet.
In either case, the goal is the same: to generate tension through your knees and hips.
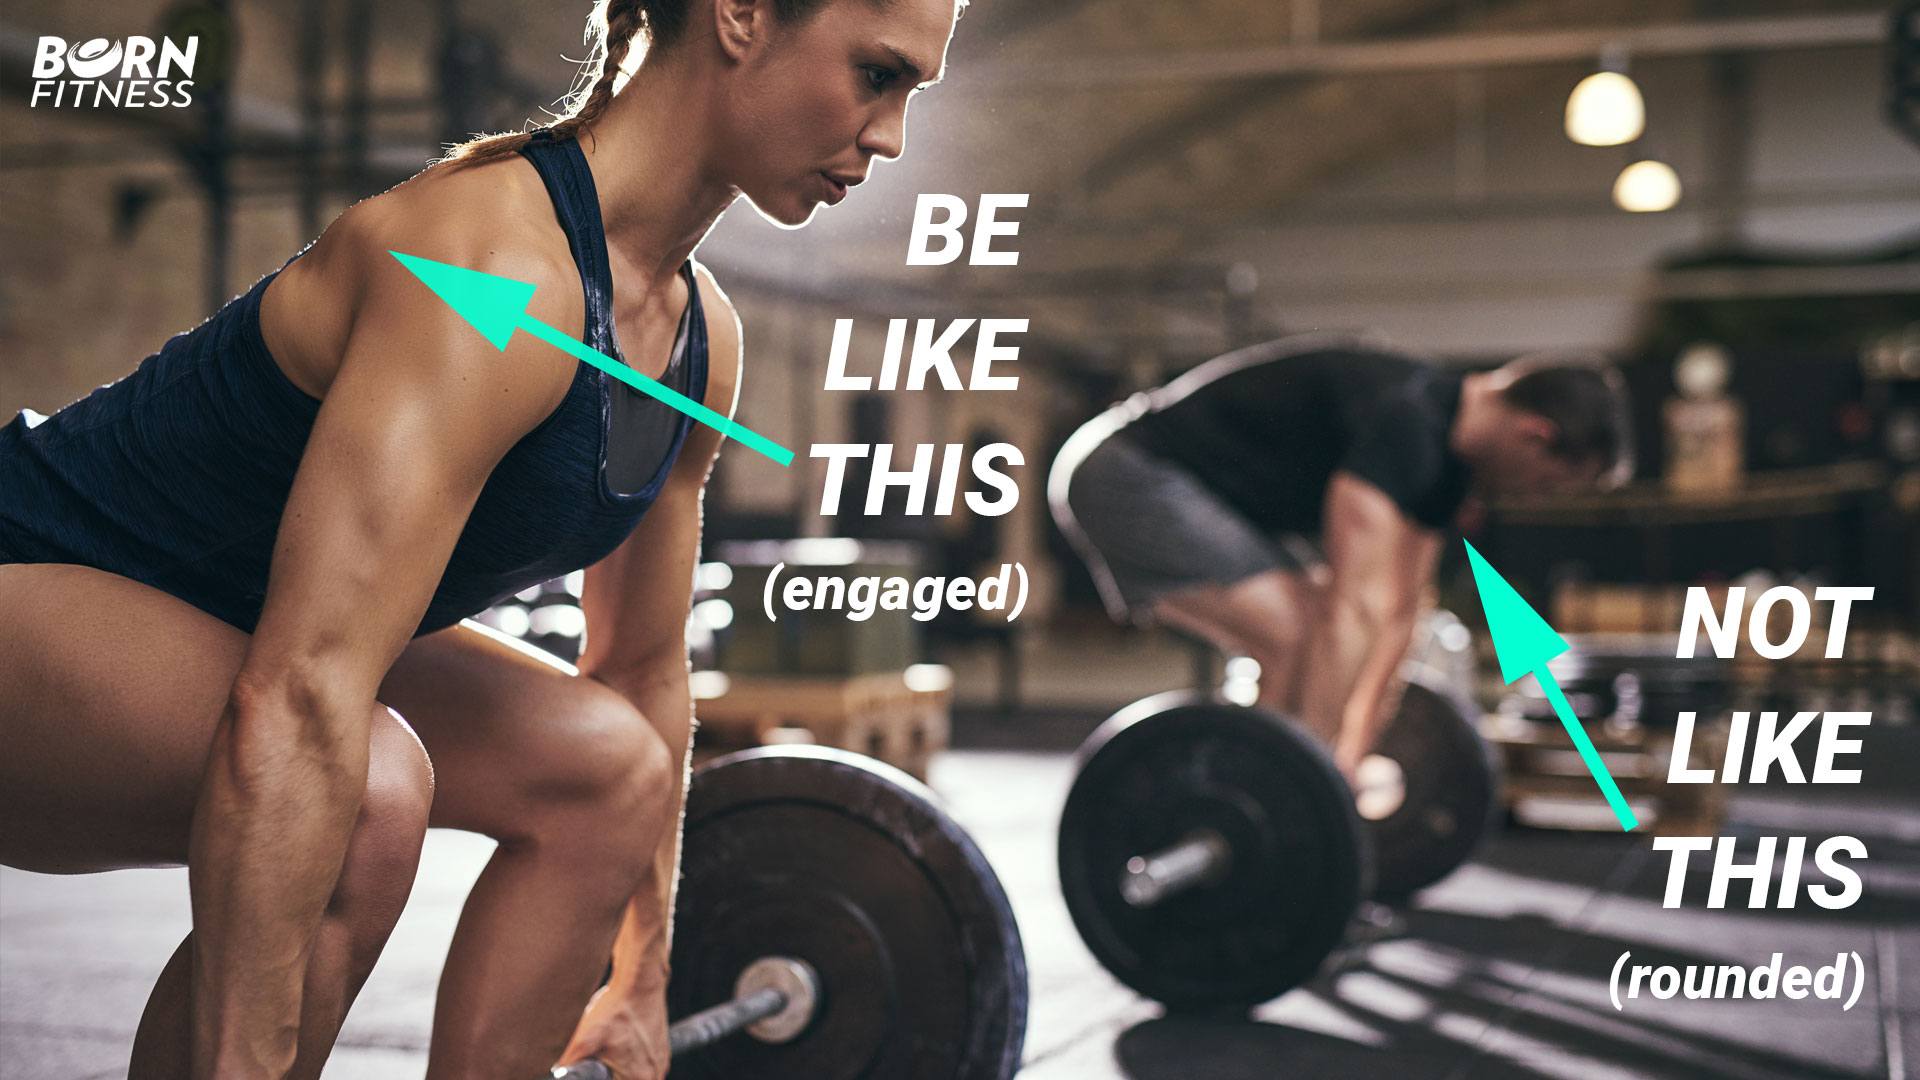
Keeping your core, arms, and lats engaged will help you avoid what you might call the Angry Cat Deadlift.
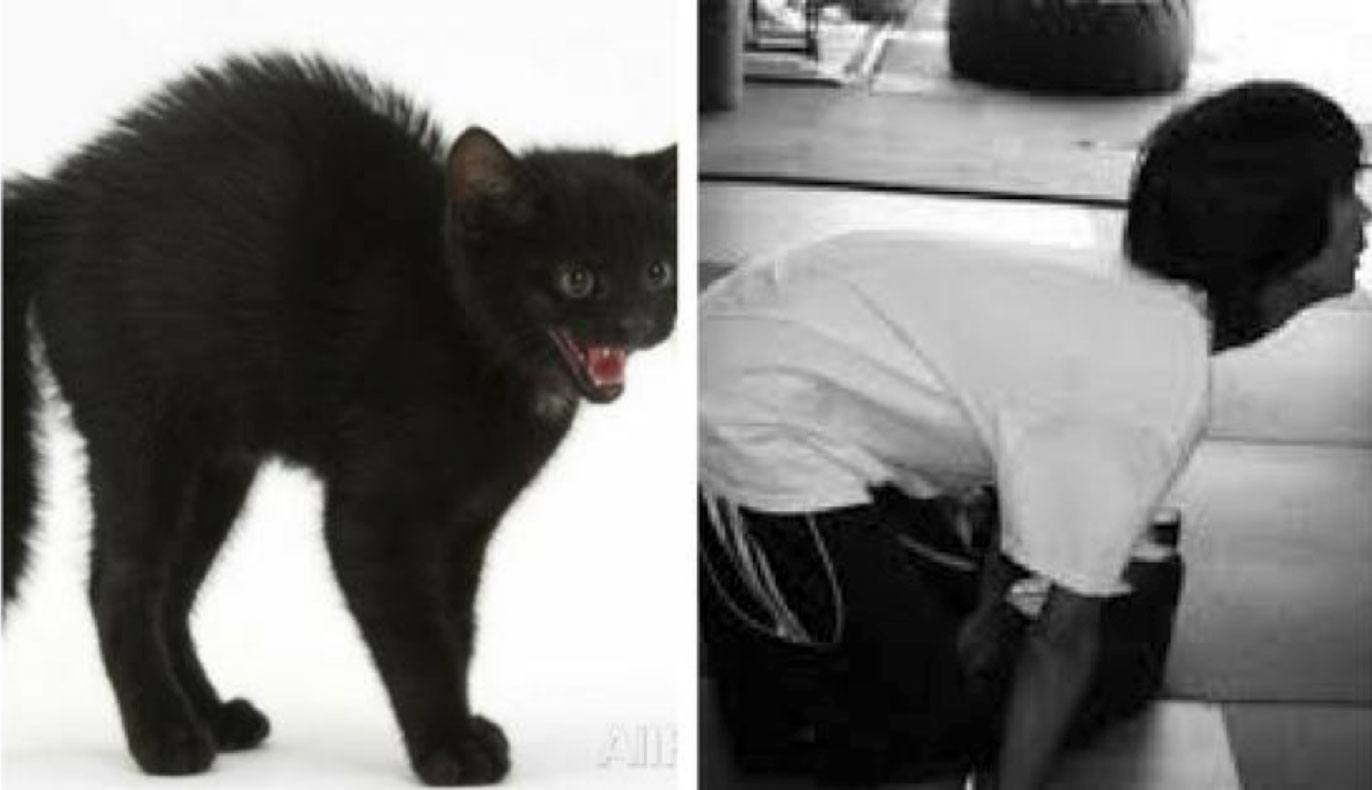
In an Angry Cat Deadlift, the lats aren’t activated enough, or the person’s core isn’t sufficiently braced, and the first thing that comes up is their lumbar spine.
If your lats are engaged and your core is firmly braced, then you probably won’t run into this problem. However, if you do feel your lower back rounding, it’s a sign that you’re using too much weight. Lower the load, work at a resistance that doesn’t cause you to go cat-like, and build up over time.
When you reach the top of the rep, known as lockout, pay attention.
Some people seem to think that “locking out” means “leaning back,” but nothing could be further from the truth. Doing that hyperextends your knees and spine, which can compress those all-important spinal discs between your vertebrae.
https://www.instagram.com/p/BWeXIFLF_oJ/?taken-by=wilfredofitness
The goal, really, is to just stand up. When you’re standing tall while holding the weight, you’ve completed the rep. You do not need to try and shrug with your traps. Simply stand up straight, thrust your hips, and focus on squeezing your glutes at the end of the lift.
Lastly, when you reach the top of the rep, you have two options:
- Dropping the weight
- Lowering the weight back to the floor
Option #1 is generally considered bad form for most fitness trainees (and definitely will get you some angry glances from your gym’s owner, especially if you aren’t using bounce plates), but there are some times when you may consider it.
Certain training modalities use this pull-and-drop technique—Pavel Tsatsouline employed it with Olympic sprinter Allyson Felix to famous results.
But even if you’re not training for a gold medal, removing the eccentric (lowering) phase may decrease the likelihood of hamstring or lower back injuries. So if those are concerns of yours, you may want to consider using the drop. (And if you do, definitely look for bounce plates.)
But if you’re just looking to build full-body strength, you’re better off lifting and lowering the weight.
That brings us to Option #2. Remember all of that tightness you generated in order to hoist the weight? Don’t let go of it once you reach the top.
Having several hundreds pounds of weight in your hands is typically a bad time to lose rigidity.
Instead, keep all of that tension in your arms, lats, core and legs, and lower the weight to the floor. Continue to keep your feet pressed firmly into the ground. Maintain that tight grip on the barbell as you set the weight back back where it started.
READ MORE:
How Low Should You Squat, Really?
3 Rules for Building Bigger Arms
The Tension Weightlifting Technique: How to Make Every Exercise More Effective
Greatly explained the position of gripping and whole body for whole body in a gym setup. Tips are cool…
Superb description of the deadlift. It has really helped me improve my lift.
Great Blog!Thanks for sharing such valuable information.